(INFORMATION TAKE FROM: http://www.mto.gov.on.ca/english/trucks/handbook/section1-5-1.shtml)
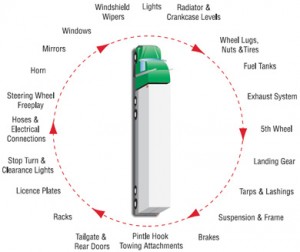
Diagram 1-4 shows a systematic circle check you should make. Details of the check can change according to the type of vehicle, but generally the principle of making a complete circle should be followed.
Some points to look out for are given in the sample.
As part of the road test, you will be expected to do the following:
- Check fuel tank and fuel cap.
- Adjust seat and mirrors.
- Start engine.
- Check horn, wipers and all gauges and ensure that the low pressure warning device is operating.
- While air pressure is building up, check emergency equipment.
- When maximum pressure is gained, check for air leaks.
- Check all braking systems
- Apply brakes, checking for pressure to drop.
- Turn on lights (low beam), put on left signal.
- Turn on all lights.
- Check wheel lugs, nuts and tires.
- Examine air hoses and electric lines to trailer (class A only).
- Check suspension and frame.
- Check tailgate, trailer doors or tarp tie-downs.
- Inspect trailer dolly wheels (class A only).
- Check fifth wheel (class A only).
- Observe dimmer switch operation, put on right signal.
- Check signal lights and high-beam headlights.
- Clean glass and mirrors.
- Check for dangerous goods.
- Check driver and passenger door for function.
- Check heater and defroster.
- Check driver controls.
Uncoupling and coupling of combinations (class A only)
Uncoupling
- Secure tractor and block trailer wheels if necessary; make certain trailer spring brakes are applied.
- Check to see if the ground is firm enough to support landing gear. If necessary, use planks or pads.
- Lower trailer landing gear far enough to pick up the weight of the trailer to proper height for uncoupling and secure the handle. Take care not to raise the trailer so high that no weight is on the fifth wheel, and avoid uncoupling with the trailer so low as to make re-coupling difficult or impossible. If the trailer has two-speed crank gear, place it in low range and stow the crank securely.
- Release the secondary lock and pull the fifth-wheel locking handle as far as it will go into the open position.
- Start the tractor and pull ahead until the trailer upper plate slips to the lower part of the fifth wheel, just above the chassis of the tractor. Stop and secure the tractor in this position.
- Close the air lines either by cocks at the rear of the tractor cab, or the control valve on the dash.
- Disconnect the supply or emergency air line from the trailer supply or emergency coupling; secure it to the dummy coupler on the rear of the cab.
- Disconnect the light cord from the socket on the trailer; hang it on the rear of the cab.
- Disconnect the service air line from the trailer service coupling; secure it to the dummy coupler on the rear of the cab.
- Get back in the tractor and pull ahead slowly until the two units are separated.
CouplingBe sure the fifth-wheel jaws are fully opened and the fifth wheel is tilted back so that hook-up can be made without damage. Make a visual inspection of the condition of the king pin and the fifth wheel. If the tractor is not equipped with a trailer hand valve or an emergency control valve, the trailer wheels must be blocked.
- Back the tractor so the fifth-wheel slot is in line with the trailer kingpin.
- Stop the tractor just as the fifth wheel makes contact with the trailer.
- Secure the tractor and check to see that the trailer is secured against movement before coupling.
- Connect the brake lines and light cord to the trailer before coupling.
- Open cocks or actuate the control valve on the dash in the cab to charge the trailer air system.
- Release the trailer hand-control valve and listen for exhausting air to determine whether the trailer brakes are operating.
- Be sure the trailer brake lines are properly connected. These are the standard colours usually used in the trucking industry.
RED is supply or emergency
BLUE is service - Before backing under the trailer, check the height of the trailer in relation to the fifth wheel. The trailer should be at a height where moderate resistance is met as the fifth wheel contacts the trailer plate.
- Back slowly under the trailer. See that firm contact is made between the fifth wheel and the upper plate on the trailer. Continue backing until you hear the jaws lock.
To test hook-up
Place the transmission in reverse and then partially release the clutch to move the power unit backward in a short, sharp motion. This is known as “hitting the pin.”
Depress the clutch and place the transmission in the lowest forward gear. If the vehicle is equipped with a trailer hand control, pull it down to set trailer brakes to keep the unit from rolling. If there is no hand control, set the trailer parking brake.
Try to pull forward against the pin.
AS ALWAYS REFER TO THE MTO GUIDES FOR LATEST UPDATES….
http://www.mto.gov.on.ca/english/trucks/handbook/section1-5-1.shtml
Recent Comments